The Ultimate Blogging Client for Linux

How it all started
Ever since i started a blog i had always wanted a wanted a application which would allow me do my blogging (preferably offline ) without having to use the web browser. One of the reasons for this was because i (as at then) did not have a stable Internet connection and had to go to Internet cafe to do my blogging which wasn’t really convenient. I wanted a way to do my blogging offline and then upload later. Even when i had a stable Internet connection i still prefer to having to use a browser for blogging. Unfortunately for me most of the blogging applications ( Drivel BloGTK KBlogger gnome-blog) i tried on Linux just didn’t cut it, some didn’t work with wordpress and the once that did weren’t powerful enough or were buggy or just too basic.
I gave up and resigned my self to the web for blogging. This was until recently when (I Cant quite remember how it happened) i found about about Bilbo Blogger and Beng. I saw the tool i just needed
Bilbo Blogger
Bilbo Blogger is a free/Open Source Blogging client, focused on simplicity and usability. Its is based on Qt4 (KDE) but should work well on gnome (i haven’t tried it but it should.. just remember i said should)
Here are some Summary of some of its Features
Currently featured:
- A full featured WYSIWYG editor + An HTML editor
- Previewing your post with your blog style! like when you are visiting it at your blog.
- Support for Blogger1.0, MetaWeblog, MovableType (WordPress supports All of these!) and Google GData (used on Blogspot.com blogs) APIs!
- Support for Creating/Modifying/Deleting posts.
- Support for creating drafts and scheduled posts!
- Support for uploading media files to your blog (Just on supported APIs e.g. MetaWeblog and MovableType)
- Support for Fetching your recent blog entries.
- Support for adding Images to post from your system. It will upload them on
- Submitting post to blog (Just on supported APIs e.g. MetaWeblog and MovableType)
- Support for saving local entries before publishing.Saving your writing copy to prevent data loss, at configurable intervals.
- Internal auto spell checker. (KDE spell checker used so most of languages are supported)
Installation
Although as of blog time there were only two binaries available for Linux and one for windows.
Archlinux users Bilbo should be available in the arch community repository ( am not sure about this as i don’t have an arch installation to confirm) but in any case an arch package can be downloaded from here
(K)Ubuntu
To install on ubuntu. You are going to add a third party repository popularly called PPA To your system. This is not hard.
To start open Terminal and copy and paste the following command (you can do this via GUI but when writing a guide some things are better down using commandline copy and paste of cause i would explain every process so at least you know what you are doing)
First we download and add the key for the repository we are about to use and add it to how system.
sudo apt-key adv --recv-keys --keyserver keyserver.ubuntu.com 0xfe0272d55c41c17774052e575646f8b10331274d
Then we add the repository with this command
echo deb http://ppa.launchpad.net/neversfelde/ppa/ubuntu `lsb_release --short --codename` main | sudo tee -a /etc/apt/sources.list
Then we refresh the system and download bilbo with
sudo apt-get update ; sudo apt-get install bilbo
Once installed you can find Bilbo on the Internet section of your application Menu
Now i give a brief guide on how to configure Bilbi blogger to your blog
First your start bilbo ( like you don’t know that already hehe) once installed you will find it under the Internet section of your application menu.
The first thing you want to do is to add a blog, (my blog is hosted on wordpress.com hence that is what this guide would be based on. )
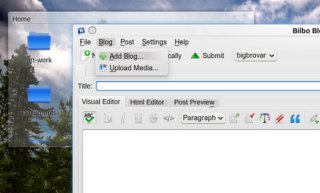
Just select Add Blog from under Blog menu

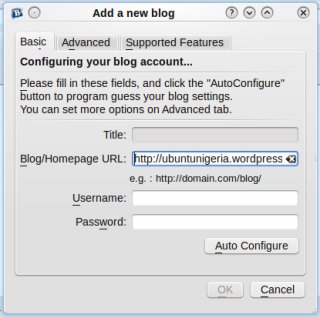
This would open a dialog box, something like this

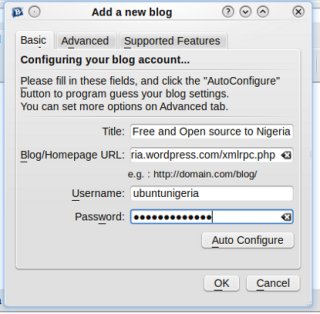
Type in the URL of your blog then enter your blogs username and password and click the Auto Configure button. In my case it was http://ubuntunigeria.wordpress.com and i clicked the Auto Configure button. Then Bilbo would work its magic and Auto configure the settings for the blog. If all goes well (and it always did in my case) The dialog box would now look like this.

Bilbo has auto configured my blog settings, pulling the Title of the blog, the correct URL. You can go to the Supported features tab and check out the list of features bilbo has support in your blog here is mine

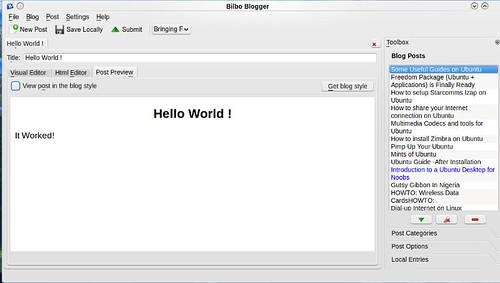
Once your blog is configured and loaded up. you would see a page which looks like this.

So here is the layout of Bilbo Blogger, it always you to use both WYSIWYG, or for code warriors you can always use the HTML editor field. one really cool feature with bilbo is the ability to preview you draft and see how it would look like on the blog page, This for me is one of its killer features
HTML Editor

Normal Preview

Preview with blog style

Other cool features of Bilbo
- It support multiple blogs hence you can setup more than one blog at a time.
- It also allows you to edit previous blog posts ( or delete them)
- If you are working on a blog post, you can always tell it to save locally, like as i was writing this post, i got disconnected, if i was using the web interface i might have lost some of my works or would have to wait for the Internet to get back before i continue. With bilbo i just told it to save my work locally and continued working.
- It also allows you to add tags and post the blog to a category
Bilbo also supports tabs you can edit more than one blog at a time with it just by opening a new tab.
Most importantly i found bilbo to be very stable, its doesn’t slow down on me or crash on me. i never experience on crash with it.
There is just so much to talk about Bilbo you would have to give it a spin to see your self.
I hope someone finds this useful.
